🖥️ ServerX — initial deployment & commissioning notes
This document captures the Attestant-specific steps we apply when commissioning ServerX machines: ordering choices, initial SSH access, filesystem/fstab adjustments, DNS/netplan fixes, and apt sources corrections.
Quick summary
| Area | Action |
|---|---|
| OS image | Use Ubuntu 24.04-server (Attestant base image) |
| Auth | Use SSH public key (store private key as mode 400) |
| RAID | Select vendor RAID; use Advanced Settings if UI locks fields |
| Post-setup | Fix fstab, regenerate ext4 with our options, update netplan & apt sources |
🔐 Initial deployment checklist
- Log in to the ServerX portal: https://portal.servers.com/login
- Select Ubuntu 24.04-server (64 bit) as the OS.
- Provide your SSH public key (ensure private key is saved locally with mode 400).
- Choose RAID options appropriate to the server role.
- If the RAID UI appears locked, toggle to "Advanced Settings" and back to unlock editing.
- (Optional) Add partitions like
/optif needed for workloads — we usually move PostgreSQL to/var/lib/postgresqllater.
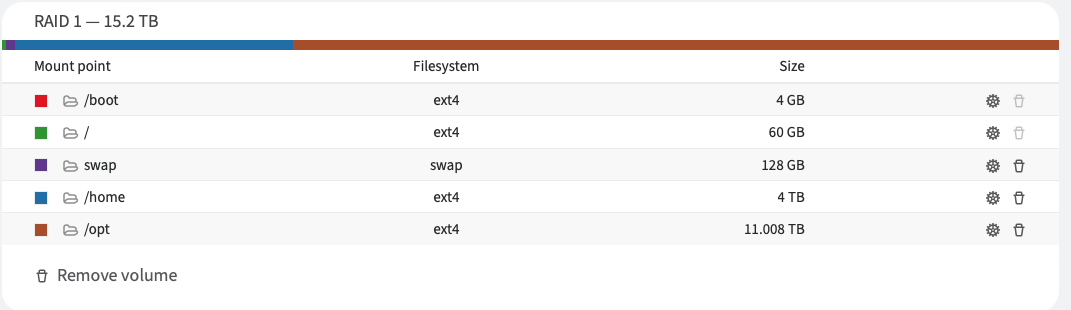
After provisioning you'll receive an email. SSH in as the provided user (often root):
ssh root@<ip-address>
Set the DNS name in our DNS provider and update the ServerX control panel hostname to match (e.g. eth-val-p01-03.attestant.io). Add PTR record for reverse DNS from the ServerX Networks panel.
🧰 Correct initial filesystem configuration
ServerX may create LVM and fstab entries by default. We standardise filesystems to our options.
Warning: destructive operations follow. Confirm device names before running any mkfs or umount commands.
Steps (example for /home):
# unmount target
sudo umount /home || true

# find UUID and device
blkid | grep <UUID-or-partial> || lsblk -f

# (example) regenerate ext4 with our recommended options
sudo mkfs.ext4 -I 256 -b 4096 -O has_journal,ext_attr,sparse_super,resize_inode,dir_index,filetype,extent,flex_bg,large_file,huge_file,uninit_bg,dir_nlink,extra_isize /dev/mapper/<vg>-<lv>.home

# reload systemd units and remount
sudo systemctl daemon-reload
sudo mount -a
If you created /opt for PostgreSQL during provisioning but prefer /var/lib/postgresql, create the target and update /etc/fstab accordingly, then repeat the same regenerate/remount process for that mount.
Example /etc/fstab entry:
UUID=xxxxxxxx-xxxx-xxxx-xxxx-xxxxxxxxxxxx /home ext4 noatime 0 0
🌐 Netplan, DNS and apt repo fixes
ServerX can use internal DNS and internal apt mirrors which are blocked by our firewall. Replace internal nameservers and apt sources with public mirrors.
Netplan example (update the nameservers section to use public resolvers):
# /etc/netplan/01-netcfg.yaml (snippet)
network:
  version: 2
  ethernets:
    ext0: {}
    ext1: {}
  bonds:
    agge:
      interfaces: [ext0, ext1]
      parameters:
        mode: 802.3ad
      addresses: [88.211.226.236/29]
      nameservers:
        addresses: [8.8.8.8, 8.8.4.4]
      routes:
        - to: 0.0.0.0/0
          via: 88.211.226.235
Apply changes safely:
sudo chmod 600 /etc/netplan/01-netcfg.yaml
sudo netplan generate
sudo netplan apply

sudo rm -f /etc/resolv.conf
sudo ln -s /run/systemd/resolve/resolv.conf /etc/resolv.conf
sudo systemctl restart systemd-resolved.service
Replace internal apt sources in /etc/apt/sources.list with a public mirror (example uses UK mirror):
deb http://gb.archive.ubuntu.com/ubuntu noble main restricted universe multiverse
deb http://gb.archive.ubuntu.com/ubuntu noble-updates main restricted
deb http://gb.archive.ubuntu.com/ubuntu noble-security main restricted
Then update packages:
sudo apt update && sudo apt upgrade -y
✅ Post-setup checks
- Verify filesystems:
lsblk -fanddf -h - Confirm no unexpected swap:
swapon --show - Check DNS resolution:
dig +short example.comorgetent hosts attestant.io - Confirm apt sources are reachable and
apt updatesucceeds.
Links
- ServerX portal: https://portal.servers.com